
Case studies
Five recent surveys, with names, addresses and identifying details left out. Each one shows how I work: find the cause first, then set out the options so you can decide.
A dipping floor and damp readings in an Edwardian house
A damp and timber survey of a solid-walled house of about 1910. Readings were high at the base of some walls, and the dining room floor dipped underfoot.
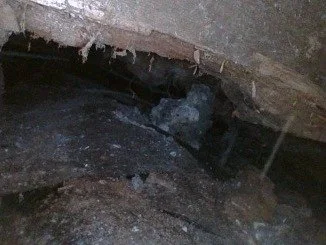
What I found. The suspended timber floor in the dining room dipped and sprang underfoot. Where a board had been lifted, some timber was soft, crumbly and missing in places. A camera under the floor showed some timbers in reasonable condition, but only part of the void could be seen. At some point the floor had been covered with laminate, vinyl or similar, there were few air bricks that clearly ventilated the void, and the ground outside was relatively high. A drain-type detail beside the walls used stone that was unlikely to drain freely. A chemical damp-proof course had been added, but the walls were irregular and rubble-filled with voids, where injection often can’t form a continuous barrier. Inside, original lime plaster had been skimmed with gypsum and painted with less vapour permeable paint.
What I recommended. In priority order: lift sections of the floor to inspect the joist ends and ventilation, repair or replace only the defective timber (not the whole floor), and improve ventilation with correctly sleeved air bricks. Reduce ground levels and improve drainage beside the walls. Repair loose or hollow plaster room by room as each is redecorated, using lime plaster and vapour permeable paint, with no need to strip everything out. No further chemical damp-proofing.
Patchy damp in an old terraced house
A mid-terrace house of about 1830 with solid, mixed masonry walls. Damp and mould in the lounge and the bedroom above it. I surveyed those areas of concern, not the whole house.
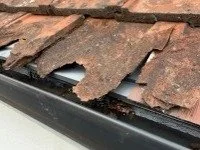
What I found. Two small inspection holes and a borescope showed the front wall was solid, mixed masonry holding some moisture, not a cavity wall. Outside, the hard render was cracked in places, several roof tiles at the eaves were damaged or worn with a makeshift repair beneath them, and the gutter was holding standing water. Inside, the readings were patchy rather than a simple rising damp pattern: very high around a crack in the lounge wall, a damp-stained corner high up in the bedroom, and a wet tide mark on an MDF skirting low down in the lounge, where the floor may have been concreted over some years ago and furniture sat tight to the wall. There was less mould than the humidity levels would suggest, helped by the lime-based finishes.
What I recommended. A staged approach rather than a big dig. First, repair the roof tiles and eaves and clear and re-set the gutter (a budget guide of about £500 to £1,500, more if scaffold or a tower is needed). Then repair the render cracks with compatible materials, avoiding hard patches, and don’t strip the render unless problems continue. Replace the wet MDF skirting and check the floor edge, keep furniture off the wall and keep the dehumidifier running; if it comes back, open up the floor edge and form a vapour-open perimeter detail. Keep humidity around 50 to 60%, use limewash or a vapour-open paint, and monitor after the roof is fixed before any plaster comes off.
A bathroom fan blowing damp air into a chimney
A detached cavity-wall house of about 1900 with later extensions. Damp staining on a bedroom chimney breast and raised readings low down on walls in several rooms.
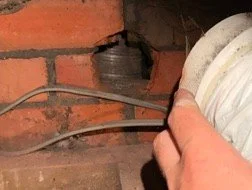
What I found. Several causes working together. In the loft, the bathroom extractor duct had come almost completely away from its outlet and was discharging into the loft and the old chimney stack instead of outside. Warm, damp air meeting cold brickwork forms condensation that runs down into the building, a likely contributor, possibly the main one, to the bedroom staining. White mould was growing on timbers beside the stack, and the back of the stack looked like a weak spot for rain. Elsewhere: downpipes discharging onto the patio or into gravel beside the walls, cracks at the joins between the house and its extensions, hard cement pointing over softer old brick, masonry paint on the rear wall, old suspended floors infilled with concrete (which can push ground moisture towards the wall bases), and a borescope look into the cavities showing patchy insulation with moisture and debris at low level.
What I recommended. Each issue came with three options. For the fan:
Do nothing. The humid air keeps going into the chimney, the staining likely worsens, and timber decay and mould follow.
Do something. Disconnect the duct from the stack, cap the opening in the loft, and run the duct to a temporary outside outlet while you monitor.
Do it all. Take down the redundant stack, fit a properly specified fan with a direct duct run to a roof outlet, and seal the bathroom ceiling downlights so damp air can’t bypass the fan.
Damp stains high on a bedroom wall, traced to the loft
A detached cavity-wall house of about 1930, with damp staining at the top of a bedroom wall beside a capped chimney, and a smaller patch in a second bedroom.
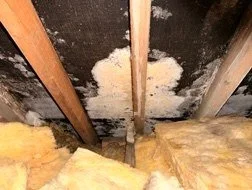
What I found. The staining came and went with the seasons instead of growing or running during rain, which pointed away from a simple roof leak. Readings were highest high up on the wall near the chimney corner and tapered off lower down, and thermal imaging showed the upper wall running colder. In the loft there was widespread soft mould on the underside of the roofing felt and nearby timbers, worst towards the gable and chimney corner. The timbers still felt firm, so it looked like surface mould rather than decay. The roof void was not well ventilated, the insulation was patchy and disturbed, and warm, damp air from the house was likely rising into the loft and condensing on the cold felt. The cavity walls also hold retrofitted polystyrene bead insulation, which can hold moisture in the gaps between the beads near the top of the wall. The chimney had recently been capped with no clear ventilation to the old flue, the new cement capping was already cracked, and a horizontal crack on the gable could let some water in.
What I recommended. Start with the cheaper, better-evidenced fixes before any big chimney or roof work. Ventilate the loft with eaves vents and felt lap vents or wedges, lay the insulation evenly without blocking the eaves, clean off the surface mould, and track humidity with hygrometers, with a dehumidifier on the landing in colder months. Repair the gable crack with a flexible material and ventilate the old chimney void at low and high level. Have the cracked capping reviewed, and look closer at the leadwork only if the staining carries on. Leave redecorating until the walls have dried, which may be slow with bead insulation.
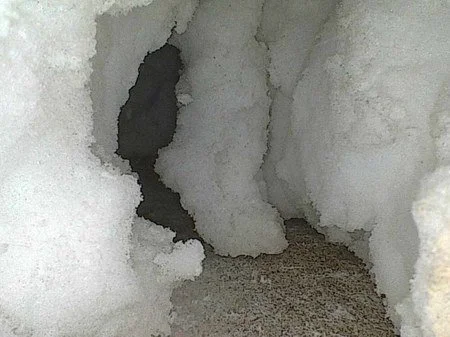
Cavity walls checked with a camera: patchy foam, sound ties
A single-storey detached house of about 1970, with cavity walls and foam insulation added in the 1990s. I was asked to assess the cavities.
What I found. I formed small inspection holes in the main walls and looked into the cavities with a borescope camera. The foam insulation was very patchy, with large gaps, and where it was present it was brittle and crumbly. The wall ties I could see were in satisfactory condition, with no significant rust or damage, and I found no sign of widespread tie failure. There were a few mortar snots and small bits of debris, but no heavy blockage. The gable wall was the most weathered, with worn pointing and salts. A few high moisture readings inside near that corner did not line up with any blockage, and looked to be down to salts, cold bridging, patchy insulation and the weathered pointing rather than a major damp problem.
What I recommended. Repoint the weathered gable wall in a compatible mortar, avoiding hard cement, and repair any cracked or loose brickwork around windows and lintels. Monitor the high readings after those repairs, and don’t treat them as a major damp defect without visible damage. No wall tie replacement is needed now. Removing the old foam isn’t urgent, though it is unlikely to be insulating well, so if better insulation is wanted later, take specialist advice on removal and re-insulation.
Talk it through with me
Tell me what you’re seeing and where, and I’ll tell you plainly which survey fits. Call 07421 996581, email Harry@alderbuildingconsultants.co.uk or use the contact page. Not happy with your report? Tell me and I’ll refund you in full. You only pay once your report and invoice have reached you.